A Brief Tutorial on WooCommerce Plugin Settings
Video Tutorial
Here is a brief overview of WooCommerce settings. WooCommerce configuration can be quite complex; for full details, watch the video above.
WooCommerce Settings
All WooCommerce settings are in the WooCommerce menu on your dashboard.
Orders
In this menu, you can see all orders from your customers. You can also update order statuses here. See the video above for details.
Coupons
In this menu, you can create coupon codes for your customers. These can be used for special discounts, and more.
Reports
In this menu, you can view your sales reports.
Settings
This menu contains the important WooCommerce settings. Below is a brief explanation of the Settings menu.
General Tab
Store Address = Sets your store’s country and address (i.e., where you are located as the seller). This determines default tax rates and customer location.
General Options
- Selling location(s) = Choose to sell to all countries or specific countries. You can select multiple or specific countries.
- Shipping Location(s) = Choose to ship only to countries you sell to, or a subset of countries. You can disable shipping and all shipping-related functions.
- Default customer location = Choose the location assumed for visitors before they enter it, to calculate tax and shipping.
- Shop base address = Tells the system to assume they are at the same location as your store.
- No address = Does not assign a location, and no tax is calculated.
- Geolocate address = Verifies the visitor’s current location and calculates tax accordingly.
- Geolocate with page caching support = same as above, but geolocation via Ajax. You may see your site URLs have ?v=xxxxx appended. This is normal to prevent statically cached prices.
- Enable Taxes = Enable or disable taxes in your store.
Currency Options
Options that affect how prices are displayed on the frontend.
- Currency = Choose the store’s default currency. Only one can be selected. For Indonesia, choose Indonesian Rupiah.
- Currency Position = Choose the default currency position for prices: Left, Right, Left/Right with a space
- Thousand Separator = Choose the symbol used for the thousand separator: 1,000 or 1.000
- Decimal Separator = Choose the symbol used for the decimal separator: 100,00 or 100.00
Products Tab
There are 3 sub‑menus: General, Inventory, and Downloadable products.
General
- Shop Page = Choose which page you want as the default shop page. It doesn’t have to be the WooCommerce shop page, or you can skip it if you use another method to display products.
- Add to cart behavior = Choose how the “Add to Cart” button should behave.
- Redirect to cart page after successful addition = Automatically send the customer to the cart page after adding a product.
- Enable AJAX add to cart buttons on archives = Adds ‘Add To Cart’ options on archive pages.
- Measurements = Choose the unit of measurement for product weight and dimensions.
- Reviews = Choose whether to show if a reviewer purchased the product
- Control whether anyone can leave reviews or only buyers = Choose whether reviews must be from buyers or not.
Inventory
Choose whether to enable stock management. If enabled, you’ll have these options:
- Manage stock
- Enable stock management – Inventory for physical products is managed automatically. You can enter quantities, and WooCommerce reduces items as sales occur, showing: In stock, Out of stock, or On backorder.
- Disable stock management – Inventory and status for physical products must be entered manually. You can still enable Manage Stock per product if desired. See Cara Posting Produk di WooCommerce
- Hold Stock (minutes) = Hold products (for unpaid orders) for X minutes. When the limit is reached, pending orders are canceled. Leave blank to disable.
- Notifications
- Enable low stock notifications = Enable low stock alerts
- Enable out of stock notifications = Enable out of stock alerts
- Notification Recipient = Enter the email address for notifications
- Low Stock Threshold = Quantity to trigger low stock notifications
- Out Of Stock Threshold = Quantity to trigger out of stock status
- Out Of Stock Visibility = Choose to hide out‑of‑stock items from the catalog
- Stock Display Format = Choose how stock is displayed on the frontend.
- Always show stock = Always show stock, e.g., “12 in stock”
- Only show when low stock = Only show when stock is low: “Only 2 left in stock” vs. “In stock”
- Never show stock = Never display the quantity
Downloadable products
- File Download Method = Controls how your store provides downloadable files to purchasers. Used when you sell digital products that can be downloaded.
- Force Downloads – Files are forced to download via a PHP script. Files are inaccessible to anyone except the purchaser, and direct links are hidden.
- X-Accel-Redirect / X-Sendfile = Similar to ‘forced’ above, but with better performance and support for larger files. Requires your hosting provider to support X-Sendfile or X-Accel-Redirect; check with them first.
- Redirect only = The download URL links users directly to the file. Files are not protected from external access.
Most stores should use one of the first two methods to keep files secure from external access. Redirect should only be used if you experience issues or don’t mind insecure downloads.
- Access Restriction = Choose whether downloads require login. Not applicable to guest purchases.
- Select if downloads require login = Not applicable to guest purchases.
- Grant access to downloadable products after payment = Enable to grant access to downloads when an order is processing, not completed.
Shipping
There are 3 sub‑menus: Shipping Zone, Shipping Options, and Shipping Classes.
Shipping Zone
Shipping zones are the primary shipping settings. Think of a shipping zone as a geographic area where a set of shipping methods and rates apply. Most shipping plugins are configured here, such as woongkir or other shipping plugins.
First click Add New Shipping Zone to reveal additional settings:
- Zone Name = Your zone name, e.g., Indonesia.
- Zone Regions = Choose your region, e.g., Indonesia.
- Shipping Method = Click Add Shipping Method. A popup appears where you can choose your shipping method. If you use the woongkir plugin, choose woongkir; then woongkir settings appear—click to configure it (a separate tutorial will cover adding a shipping plugin).
Shipping Options
- Shipping Calculations
- Enable shipping calculator on the cart page
- Hide shipping costs until an address is entered
- Shipping Destination = Ship to the customer’s billing or shipping address by default, or ship only to the billing address.
- Debug Mode = Enable only for troubleshooting.
Checkout
Checkout Options
- Coupons
- Check to enable coupon usage – Coupons can be applied from the admin order edit screen (for unpaid orders), the cart, and the checkout page.
- Calculate coupon discounts sequentially = Changes coupon calculation logic to apply coupons sequentially on top of each other, rather than based on the product’s original price. When applying multiple coupons, apply the first coupon to the full price and the second to the discounted price, and so on.
- Checkout Process
- Enable guest checkout = Allow customers to checkout without creating an account.
- Force secure checkout = Force SSL (HTTPS) on checkout pages. An SSL certificate is required if selected.
- Checkout pages
Pages must be set so WooCommerce knows where to send users for checkout: Cart, Checkout, Terms and Conditions.
You don’t need to use the pages installed by WooCommerce, but you must have pages for Cart and Checkout. Otherwise, customers cannot purchase and pay. See the video above for the tutorial.
Cart and checkout pages are typically created and assigned during WooCommerce installation/setup.
To use a Terms and Conditions page, create it under Pages -> Add New, then select it from the dropdown. Terms and Conditions appear inline during checkout, and customers can check a box to accept your Terms before placing an order.
Checkout Endpoints
Endpoints are added to page URLs to handle specific actions during the checkout process. Leave defaults if unsure, or learn more here: https://docs.woocommerce.com/document/woocommerce-endpoints-2-1/
Payment gateways
Installed gateways are listed and can be drag‑and‑dropped to control the order shown to customers. You can add bank transfer, COD, PayPal, and more here.
Accounts
Account pages
Pages must be set so WooCommerce knows where to send users to access account‑related functionality. As with cart and checkout, these pages are required; watch the video tutorial above to completion.
Choose the page from the dropdown that you want to use for the my‑account page.
Customer registration
- Check Enable registration on the Checkout page = Enable registration on the Checkout page
- Check Enable registration on the My Account page = Enable registration on the My Account page
- Check Display returning customer login reminder on the Checkout page = Show a returning customer login reminder on the Checkout page
- Account Creation
- Check Automatically generate username from customer email = Automatically generate the username from the customer’s email
- Check Automatically generate customer password = Automatically generate the customer’s password
- My Account Endpoints
Endpoints are added to page URLs to handle specific actions on the my account page. Leave defaults if unsure, or learn more here: https://docs.woocommerce.com/document/woocommerce-endpoints-2-1/
Emails
For each WooCommerce email listed, you can configure your settings (optional). More detailed instructions below.

Email sender options
Set the “From” Name and “From” Address for the sender in these settings.
Email Templates
This section lets you customize WooCommerce emails.
Header Image
Enter the URL of the image you want to display in the email header. You can upload an image via the Add Media button or Media -> Add New.
Email and Text
- Base Color – Color for WooCommerce email templates.
- Background Color – Background color for WooCommerce email templates.
- Email Body Background Color – Main body background color.
- Email Body Text Color – Main body text color.
For more control, copy woocommerce/templates/emails/ to yourchildtheme/woocommerce/emails/. Or you can translate emails using the Loco Translate plugin.
Editing Individual Email Templates:
In the list above under Email Notifications are these templates: New order | Cancelled order | Failed order | Processing order | Completed order | Refunded order | Customer invoice | Customer note | Reset password | New account
Click the gear icon on the right to open additional settings.
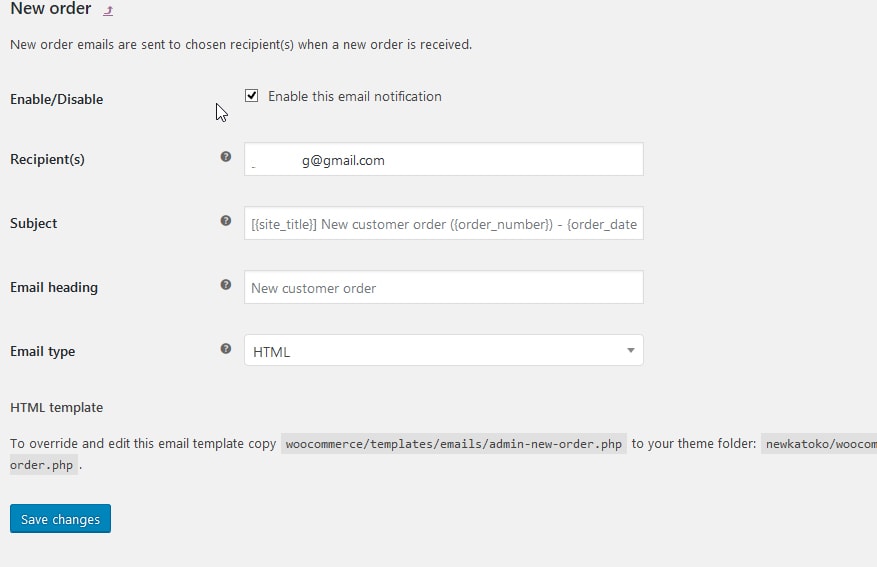
- Enable/Disable – enable this email notification.
- Recipient(s) – Enter recipients (comma‑separated) for this email.
- Subject – Controls the email subject line. Leave blank to use the default subject: [{site_title}] New customer order ({order_number}) –
- Email Heading – Controls the main heading in the email notification. Leave blank to use the default heading.
- Email type – Choose the email format to send. Options include:
- Plain Text
- HTML
- Multipart
If using Plain Text emails, remember text fields are limited to 155 characters. If your product names are long and/or have many variations/add‑ons, fields may be truncated.
HTML template
To override and edit these email templates, copy for example woocommerce/templates/emails/admin-new-order.php to your theme folder yourchildtheme/woocommerce/emails/admin-new-order.php. Or you can use the Loco Translate plugin to translate email text.
API
These settings are for developers; you can configure API, webhooks, and more here. Regular users are not recommended to change these settings.
Source: https://docs.woocommerce.com/document/configuring-woocommerce-settings/
The above uses WooCommerce in English; if you use Indonesian, settings labels will appear in Indonesian—adjust accordingly.
Hope this helps. If you have questions, contact us directly.