Adding an Opt‑in Form in Salespro
Salespro is often used to collect leads (emails).
You can add opt‑in forms from services like GetResponse, Mailchimp, or other email marketing providers.
Video Tutorial
In the original documentation, the example uses a GetResponse form.
Insert your own video ID below.
1. Get the Form Code from Your Email Service
Example with GetResponse (the concept is similar for other services):
- Log in to your GetResponse account.
- Create a new web form.
- When finished, copy the HTML form code or JavaScript code provided.
For Mailchimp / other services:
- Create a signup form.
- Copy the provided embed code (HTML/JS).
2. Place the Form on a Page (Elementor)
If you use Elementor for landing pages:
- Open the landing page with Edit with Elementor.
- Add an HTML or Shortcode widget:
- For HTML embed: use the HTML widget and paste the form code.
- If the service provides a shortcode (via an official plugin): use the Shortcode widget.
- Position the form:
- For example in the hero section, below product details, or in the sidebar (if the layout supports it).
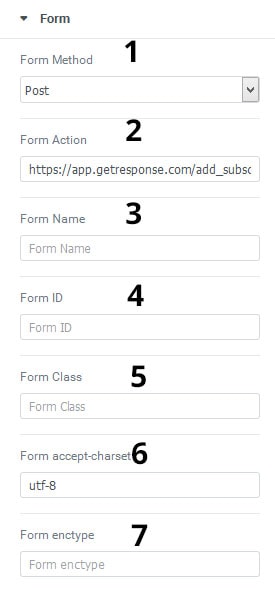
- Salespro includes an Opt‑in Form widget you can use. Here is the widget screenshot:
Notes:
- Form Method is used for method="" in the HTML form tag, either post or get.
- Form Action is used for action="" in the HTML form tag, typically a link or URL.
- Form Name is used for name="" in the HTML form tag.
- Form ID is used for id="" in the HTML form tag.
- Form Class is used for class="" in the HTML form tag.
- Form accept-charset is used for accept-charset="" in the HTML form tag.
- Form enctype is used for enctype="" in the HTML form tag.
To reorder inputs, simply drag and drop. Ensure the submit Type is at the bottom because that is the button.
3. Place the Form in a Widget Area
If you want to place the opt‑in form in the sidebar or footer:
- Go to Appearance → Widgets.
- Select a widget area (Sidebar, Footer, etc.).
- Add a Custom HTML or Text widget.
- Paste the form embed code (HTML/JS).
- Save.
4. Design Adjustments
Tips to blend the form with the Salespro design:
- Use a button color consistent with the theme’s primary color.
- Adjust the call‑to‑action text (e.g., “Get a Free Ebook”, “Sign Up Now”).
- Avoid overly long forms; ask only for name and email when possible.
If supported by your service, you can also:
- Remove the form’s default branding (GetResponse/Mailchimp) for a cleaner look.
- Set a redirect after submit to a Thank You page.
5. Testing
After placing the form:
- Perform a submit test:
- Enter a test email address.
- Ensure the data lands in your email service list.
- Check for JavaScript errors in the browser console.
- Verify the layout on mobile and desktop.
If the form does not appear:
- Ensure the HTML/JS code is not filtered by WordPress (classic editor may modify code).
- Try the Custom HTML widget or use the email service’s official plugin.