How to Install and Configure the Wpmedia Theme
Wpmedia is a theme focused on news media content with a modern layout.
Video Tutorial
Before installing Wpmedia, watch the following video to the end.
Installation Steps
- Download the theme file from the member area.
- Extract the package you downloaded, then upload wpmedia.zip via Appearance > Themes > Upload Theme.
- Activate the Wpmedia theme.
- Install and activate the recommended/required plugins.
Supporting Plugin Installation
After the theme is active, a notice usually appears to install plugins:
- Required theme plugins.
- Recommended plugins (e.g., One Click Demo Import, etc.).
Follow these steps:
- Click Begin installing plugins.
- Install and activate all recommended plugins.
License Activation
- Go to Plugins → Wpmedia License.
- Enter the license key you received from the member area:
- Log in to https://member.kentooz.com
- Open the License menu:
https://member.kentooz.com/softsale/license
- Copy the license key for the Wpmedia theme, then paste it on the Wpmedia License page.
- Save, and ensure the license status is active so updates and support work properly.
Import Demo
- Go to Appearance > Import Demo Data.
- Click Import Demo Data, install required plugins, and wait until complete.
- The layout will follow the demo; then adjust menus, widgets, and customizer settings.
After completion:
- Page structure, menus, and widgets will closely match the official demo.
Appearance Settings via Customizer
Wpmedia has comprehensive appearance settings in Appearance → Customize. Settings screenshot:
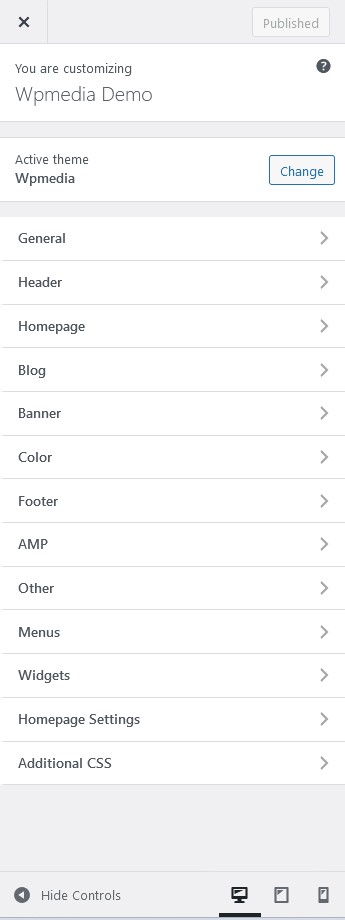
General Tab
This is the area for general theme settings. You can configure the global layout, with 3 sub‑settings: General Layout (Fullwidth and boxed), background image, and typography (to change site fonts).
Header Tab
This is where you configure your site header. You can set icons, logo, header background image, menu settings, menu layout, and more. There are 3 sub‑settings: Site Identity (logo and other site identity settings), Header Image, and Topbar & Menu (Remove Search Button, Dark Mode, Date, and topbar menu settings).
Homepage Tab
Configure the home modules and headline on your homepage. There are 3 sub‑settings: Top Notification (Breaking News in the header), Module Home (a module below the menu showing small horizontal thumbnails), and Headline (a large image with related posts).
Blog Tab
Configure your blog layout. There are 2 sub‑settings with many options: Blog Layout (sticky sidebar, site navigation), and Blog Content (configure all blog content, from disabling elements, related posts, to Facebook comments).
Banner Tab
Configure all banners available in the theme. There are 14 sub‑settings—see the video above for details.
Color Tab
Configure site colors. There are 3 sub‑settings: General color, Header Color, and Footer Color.
Footer Tab
Configure copyright text, footer social, number of footer widgets, and more. See the video above for full details.
AMP Tab
Visible only if you use the official AMP plugin; configure AMP banners, and AMP‑specific head and footer scripts.
Other Tab
Configure other settings such as head/footer scripts, analytics, pixel, and more. See the video above for full details.
Menus Tab
Configure navigation menus (shortcut to Appearance → Menus).
Widgets Tab
Configure sidebar and module widgets:
- Widgets in the main sidebar.
- Widgets in the footer.
Additional CSS Tab
Add custom CSS for advanced customization.
See the tutorial video above for more details.
Server Requirements
Recommended server setup for running Wpmedia:
- Apache with PHP 7.2+.
- WordPress 5.6+ (latest version recommended).
- Curl and OpenSSL modules enabled (required).
If you still use PHP below 7.2, upgrading is strongly recommended for security and compatibility.